Smart School Websites
  • Home
  • School Websites
  • Parent App
  • Promotional Video
  • Design & Marketing
  • Contact Us
    • Arrange a Meeting
    • Latest

Planner Staff User Guide

Home Planner Staff User Guide

We hope that you find the admin area for the planner app quick and easy to use. A basic description to help you understand how the app works is that there is a mini website that populates the app with information and you can use the admin area to send messages to either entire groups of students (categories) or individual students.

Below we have created some guides for the adding content, please click on the links below to jump to the relevant content. In your admin area please use the menu bar that runs along the left hand side of the screen to access the areas needed.
Notifications
News Posts
Forms
Events

Notifications

Step 1


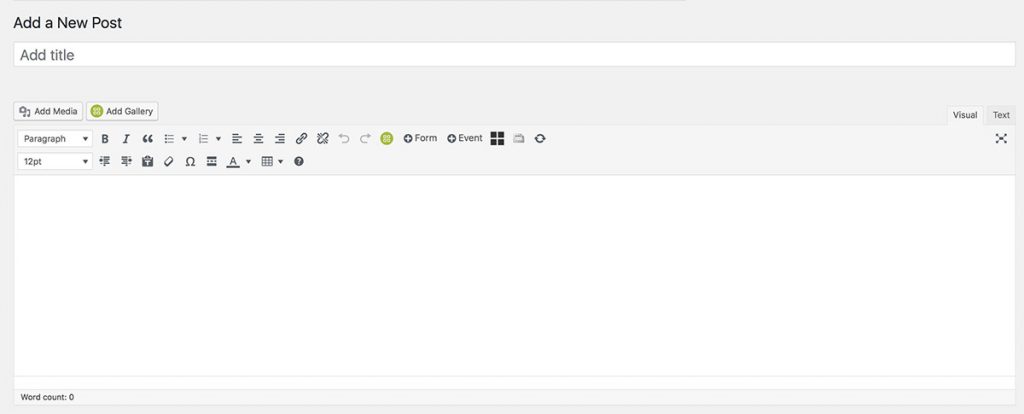
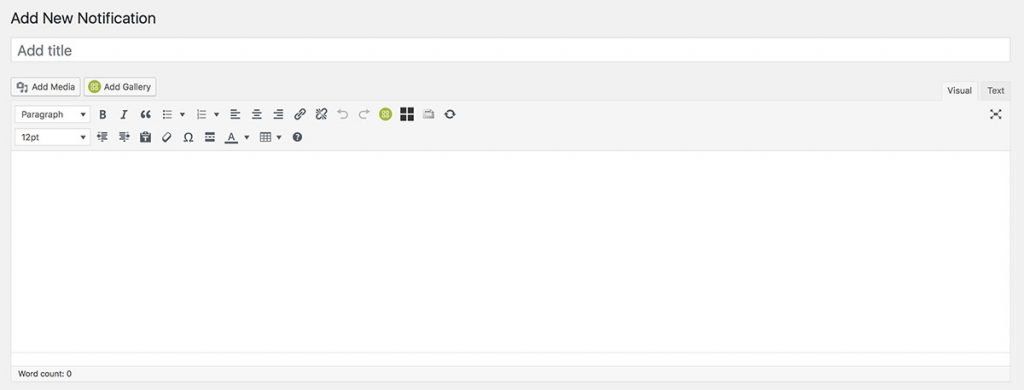
When adding a notification simply add your title and then any content needed before scrolling down.


Step 2

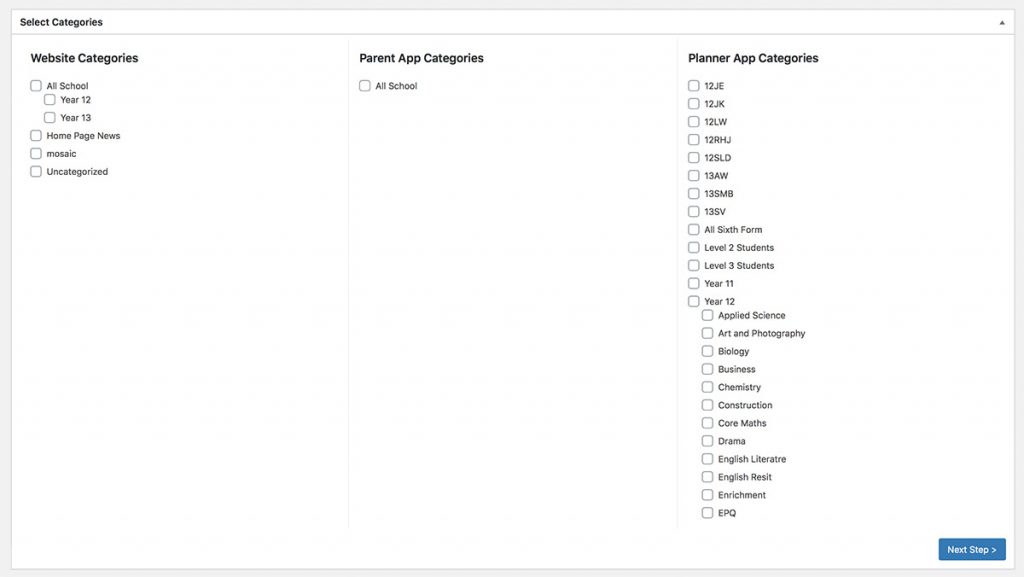
Add any categories that you wish to send the notification to. Please ensure the correct categories are set. Then press ‘Next Step’.

Please note, you don’t have to add a category, if you are sending content to individual(s) you don’t need a category. in this case, simply skip this step by pressing ‘Next Step’


Step 3


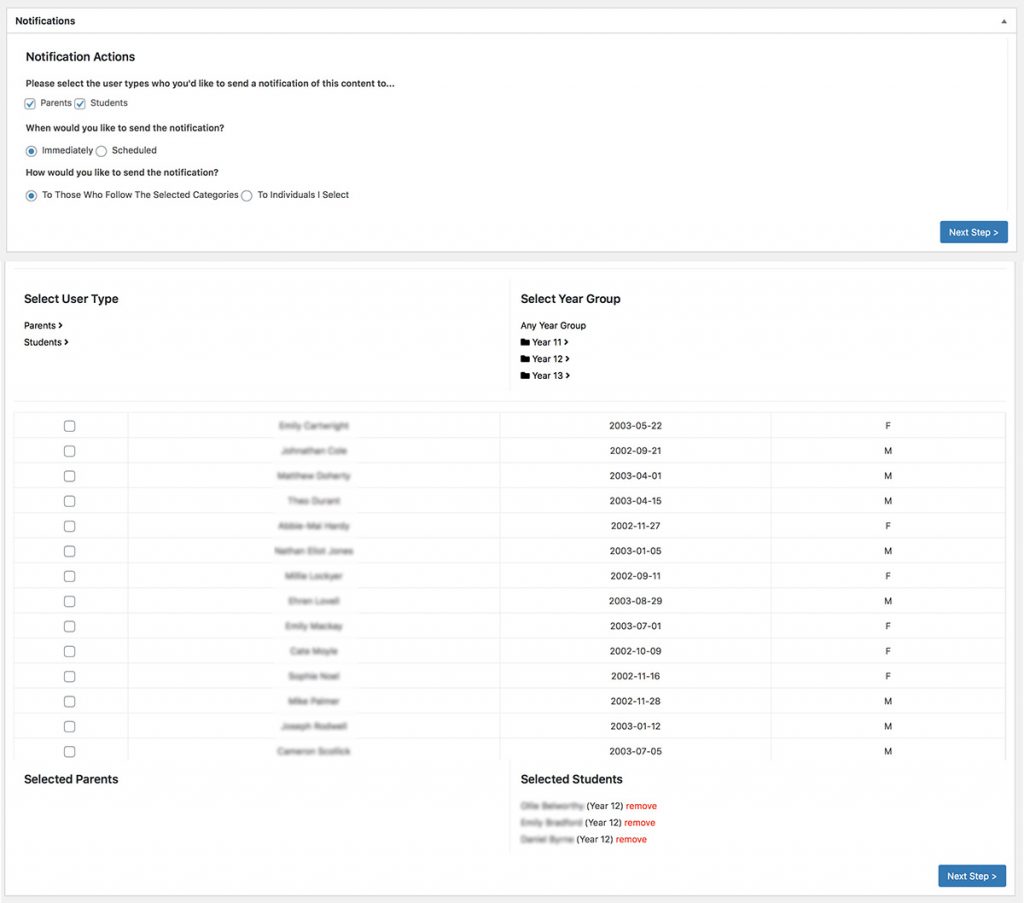
At this stage you can select if the notification is going to parents, students (or both) by either category, or to individual(s)


Step 4 – Sending to individuals

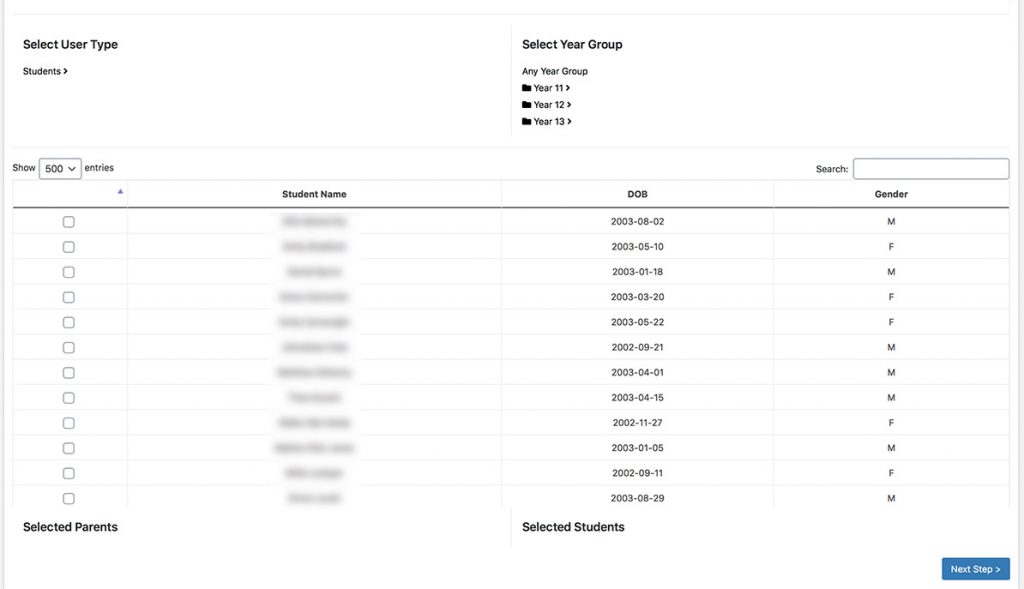
If using SIMS data you can select the year group to display the entires. As you tick student names they appear in the ‘selected students area’. You can move between year groups to tick as many students as necessary.


In the screenshot above, parents and students have been selected, then individuals. Then students have been added to the selection. (You can also add parents too)

When all the recipients have been selected press ‘Next Step’ to continue.


Step 6

If you want to schedule a reminder notification to automatically be sent use the options here, when ready press ‘Next Step’

Step 8

Finally, press publish to complete the notification creation. The notification is then published and queued to send.

^ Top

News Posts

Step 1

When adding a new News Post, simply add your title and content in the editor.

Then scroll down to edit the options for the post


Step 2

The first option is for expiry – if you want this content to expire and therefore not be visible on the website/app after a certain date/time simply enter the date and time you want the content to expire. If you don’t want this content to expire simply scroll down past this box.


Step 3

In the next section there are 2 options. If your site has a search area you can exclude this content from appearing in these search results. Tick the first box if you wish for this post not to be included in search results.

If the second option is ticked it means that the content will not be accessible to the public even if they can guess the URL. When ticking this box, only people who receive a notification about this content can access it.

When you are happy with these options scroll down again.


Step 4

The next section is where you can select categories for the news post. This determines where the post will appear. You can select multiple categories for both the website, the parent app and the planner app.

Please ensure that categories are selected correctly for both the website and the apps so that users don’t receive a notification regarding information that isn’t relevant to them.

Please note that since this is a post it has to go on the website, then optionally the parent and/or planner app. If you want to send content just to an individual or category in the app please use the notification function.


Step 5

The next section allows you to send a notification regarding this News Post. Please see the guide on notifications for a step by step guide.

If you don’t want to send a notification please just skip past these options and press  ‘Next Step’


Step 6

If you want a reminder notification to automatically go out use this area to do so. If you don’t need a reminder notification please just skip this step by pressing ‘Next Step’.


Step 7

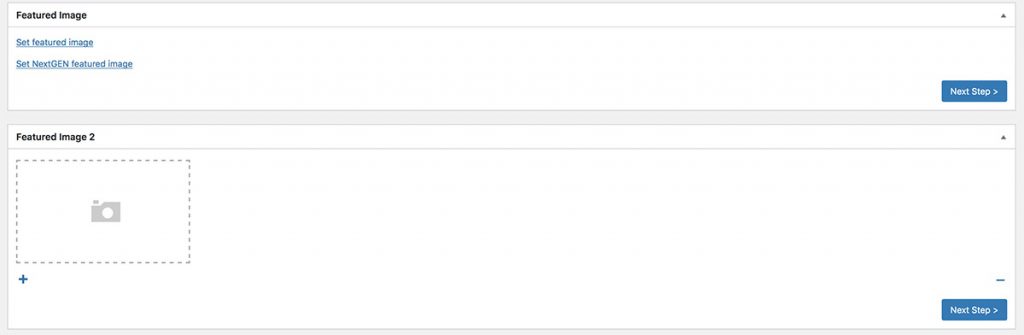
To add a featured image (the image that is displayed in a news feed or a feed on the website) click the set featured image button and follow the steps in the pop up box.

For sites that use Featured Image 2 to add a header image to content, simply use the ‘Featured Image 2’ area. Please remember that ‘Featured Images’ are generally square – or will be hard cropped to be square. ‘Featured Image 2’ images are generally rectangular images – or will be hard cropped to be rectangular.

When this section is complete, please press the ‘Next Step’ button


Step 8

The final step is to publish the News Post. In this section you can also set the post to be draft or publish at a specific time.

Press the publish button (or Save Draft if this option has been selected) to finish adding the news post content.

Bug – We are aware that scheduling content to be published at a specific time isn’t working – we are looking to fix this in the very near future.

^ Top

Forms

Step 1

When editing or creating forms, add the form title and then any content before the form (such as the text from a letter).


You can then create the form field by field. You can add multiple fields using the blue + button at the right hand side of the row. Each field can have a different inout type (single line text, multiple line text, drop down options etc.)

Please note, when using multiple choice, or drop down options – here the ‘options’ box becomes available. In this options box you can comma separate the options the user can choose from e.g. Choice 1, Choice 2, Choice 3 etc.

If you want the user to receive an email of their submission, use the email field and then tick the box that appear next to it, under the ‘primary email’ heading.

Then you can add any content that appears after the form. When the form content is complete, scroll down to edit the options.


Step 2

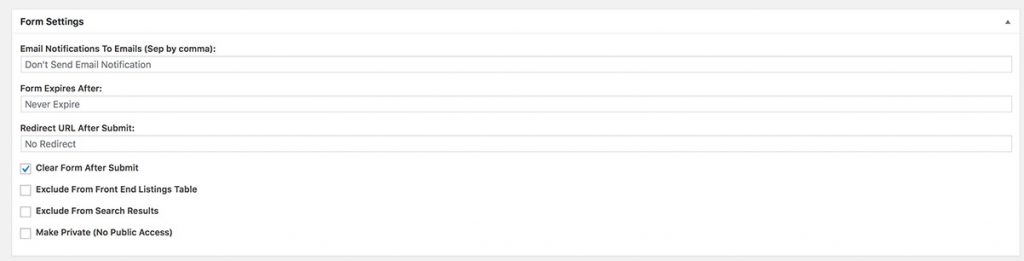
In the next section there are a number of options.

The first is an internal email address that receives notifications when the form is completed.

The next is expiry information; if you want the form to expire and therefore not appear on the website or app any more enter a date and time here.

The next option is if you want the user to be redirected to a specific page after completing the form. Simply enter a page URL here if you want to use this option.

The next option is ticked by default, to clear the form fields upon submission.

The next option is if you don’t want this form to appear in a list of all forms – should your website use this feature.

The next option is for if your site has a search area you want to exclude this form from appearing in these search results.

If the final option is ticked it means that the form will not be accessible to the public even if they can guess the URL. When ticking this box, only people who receive a notification about this form can access it.

When you are happy with these options scroll down again.


Step 3

The next section is where you can set categories for the form. This determines where the form will appear. You can select multiple categories for both the website and the apps. Or just website, or just app categories. Unlike a post, forms do not have to go on the website – they can be published to just the app(s)


Step 4

The next section allows you to send a notification regarding this form. Please see the guide on notifications for a step by step guide.

If you don’t want to send a notification please just skip past these options and press  ‘Next Step’


Step 5

If you want a reminder notification to automatically go out use this area to do so. If you don’t need a reminder notification please just skip this step by pressing ‘Next Step’.


Step 6

To add a featured image (the image that is displayed in a news feed or a feed on the website) click the set featured image button and follow the steps in the pop up box – these steps haven’t changed.

For sites that use Featured Image 2 to add a header image to content, simply use the ‘Featured Image 2’ area. Please remember that ‘Featured Images’ are generally square – or will be hard cropped to be square. ‘Featured Image 2’ images are generally rectangular images – or will be hard cropped to be rectangular.

When this section is complete, please press the ‘Next Step’ button


Step 7

The final step is to publish the form. In this section you can also set the post to be draft or publish at a specific time.

Press the publish button (or Save Draft if this option has been selected) to finish adding the news post content.

Bug – Currently the ability to publish at a specific date doesn’t work – we are working to fix this in the near future.

^ Top

Events

Step 1

After adding the event title, you can then add content relating to the event.

When the event content is complete, scroll down to edit the options.


Step 2

In the next section there are a number of options.

The first is the date of the event – this is the only required field.

The next is start time, please select a start time if required.

The next option is the end date – please select an end date if required. (This is required if the event is to recur)

The next option is end time, please select the end time of the event if required.

The next option is whether the event will recur – select a recur option from the drop down if required. If this isn’t required simply leave the drop down box with the ‘Don’t Recur’ option set. If a recur option is selected, the area below will be populated with dates that can excluded such as school holidays so the recurring event won’t appear during school holidays.

The final options are for the colour of the event when viewed in the calendar.

When you are happy with these options scroll down again.


Step 3

The next option is for if your site has a search area you want to exclude this event from appearing in these search results.

If the final option is ticked it means that the event will not be accessible to the public even if they can guess the URL. When ticking this box, only people who receive a notification about this event can access it.


Step 4

The next section is where you can set categories for the event. This determines where the event will appear. You can select multiple categories for both the website and the apps. Or just website, or just app categories. Unlike a post, forms do not have to go on the website – they can be published to just the app(s)


Step 5

The next section allows you to send a notification regarding this event. Please see the guide on notifications for a step by step guide.

If you don’t want to send a notification please just skip past these options and press  ‘Next Step’


Step 6

If you want a reminder notification to automatically go out use this area to do so. If you don’t need a reminder notification please just skip this step by pressing ‘Next Step’.


Step 7

To add a featured image (the image that is displayed in a news feed or a feed on the website) click the set featured image button and follow the steps in the pop up box – these steps haven’t changed.

For sites that use Featured Image 2 to add a header image to content, simply use the ‘Featured Image 2’ area. Please remember that ‘Featured Images’ are generally square – or will be hard cropped to be square. ‘Featured Image 2’ images are generally rectangular images – or will be hard cropped to be rectangular.

When this section is complete, please press the ‘Next Step’ button


Step 8

The final step is to publish the event. In this section you can also set the post to be draft or publish at a specific time.

Press the publish button (or Save Draft if this option has been selected) to finish adding the news post content.

Bug – We are aware that the ability to schedule this content publishing at a later date isn’t working – we are working to fix this in the near future.

^ Top

© Smart School Websites – Inspirar Business Support Ltd | Privacy | GDPR

Manage Consent
We use cookies to optimise our website and our service.
Functional Always active
The technical storage or access is strictly necessary for the legitimate purpose of enabling the use of a specific service explicitly requested by the subscriber or user, or for the sole purpose of carrying out the transmission of a communication over an electronic communications network.
Preferences
The technical storage or access is necessary for the legitimate purpose of storing preferences that are not requested by the subscriber or user.
Statistics
The technical storage or access that is used exclusively for statistical purposes. The technical storage or access that is used exclusively for anonymous statistical purposes. Without a subpoena, voluntary compliance on the part of your Internet Service Provider, or additional records from a third party, information stored or retrieved for this purpose alone cannot usually be used to identify you.
Marketing
The technical storage or access is required to create user profiles to send advertising, or to track the user on a website or across several websites for similar marketing purposes.
  • Manage options
  • Manage services
  • Manage {vendor_count} vendors
  • Read more about these purposes
Preferences
  • {title}
  • {title}
  • {title}